----------------------------------------
If you've already decided to design as much of your home as you can without the help of an architect, this planning scenario takes you through the beginning steps required to gather the information, resources and examples necessary to enable you to design your own home. You will begin to see some of the required knowledge that goes into the planning of the home of your dreams. Whether it's building a new home or remodeling an existing one, both processes are exactly the same. Remodeling folks have additional burdens of starting with a box that limits them, but hopefully this will help!
Steps
- Get inspired. Planning your new home is the most critical moment of the process, and the most fun. Capitalize on the magical inspiration every project needs to make a house, a home - yours! Capture the lightning-in-a-bottle that motivates you in the first place to design your own home. Write it all down, keep a scrap book, bookmark pictures in books, take pictures, whatever your preferred method.
-
#*Write down every price quote, budget amount, phone number
- Take hundreds of pictures. Digital cameras make it cheap and easy. Shoot every angle of a building you like. You'll find more detail in the photos than you saw in person.
- Take hundreds of pictures. Digital cameras make it cheap and easy. Shoot every angle of a building you like. You'll find more detail in the photos than you saw in person.
-
- Keep a scrapbook of magazine articles, newspaper articles, business cards, etc. Begin compiling a list of every detail you like from your variousresources. The more information that you can provide to your architect or builder about paint colors, door hardware, plumbing fixtures, counter-tops, built-ins, stair details, appliances, etc. before you begin construction, the more likely you will hit your housing budget.
- Check out other examples of houses you like (friends, family, etc.) and learn about aspects of each.
- Keep a scrapbook of magazine articles, newspaper articles, business cards, etc. Begin compiling a list of every detail you like from your variousresources. The more information that you can provide to your architect or builder about paint colors, door hardware, plumbing fixtures, counter-tops, built-ins, stair details, appliances, etc. before you begin construction, the more likely you will hit your housing budget.
-
Get organized. You need documents that contain information you've gathered which serves to direct your planning efforts. Accurate documents focus attention on facts. Basic information eliminates "Pie-in-the-Sky" dream scenarios which waste time, effort and people's patience.
- Start with a Requirements List.
- Make a Wish List separately so that you can add it to your design later, as you find you can afford. Spend approximately 30 days to 6 months on this part.
- Find a scheme. You'll want to consider several different designs to find the scheme that best fits your needs. Schemes are freehand sketches drawn to capture the essence of a plan under consideration. They can be as simple as paper napkin sketches or professionally illustrated drawings. All are valid tools and each serves the purpose to convey a concept. This should take you about 3-6 months.
-
- Develop the design. This is the phase of the process where dimensions are added to the drawings. Everything must be made to fit at this phase. You will develop your scheme into a completely dimensioned drawing. With a conceptual design roughed out, scheme chosen, a theme decided upon and problems on the site ironed out, you are fitting all the pieces of the puzzle together in this step. You know you are done here when you have located on paper the location of every door and window in the house. This should take you approximately 2 months
-
- Pay a pro to draw a "Site Plan" of your property, including elevations. This will be helpful in balancing slopes, adding fill or making cuts to accommodate your dream home.
- ]]Let the steady hand of an experienced designer take over the process of shaping up the prints. If you've gotten this far on your own drawing skills, you need to delegate now. You have more important duties involved in managing your dream home.
- Draft plans. The takeaway from this step is a fully detailed set of plans that the city and construction workers will use to build your home.
Tips
- When you're starting out, put all your materials in folders and keep them in one cardboard box. When you find something, the cardboard box will be the place to put it and find it later on when you need it.
- Tools to use are simple pencil and paper and don't forget a ruler (or scale). Architects use "tissue paper" which can be found at any store that sells drafting supplies. A wooden kitchen cutting board makes an excellent drafting table! A whiteboard and erasable markers provide an excellent means to flesh out a design that is fast changing or incremental in its development. Nothing is better for getting everyone's input and involvement in a design than a whiteboard!
- A pair of scissors, glue stick and a photo copier are your best friend during the process of revising a plan. Cut and paste to your heart's content and copy!
- Take your time. Think about how you will use each space, the furnishings in the space, the circulation through and around the spaces, and what is most important about each space. Cut out measured paper shapes for furniture and cabinets and try them out to see how they will work with windows, doors and circulation paths through the space.
- Another idea is to find a friendly parking lot where you can pace out and chalk the rough dimensions of your house, including all rooms, doors and hallways. This gives you the opportunity to walk through your prospective home and really feel how the spaces relate to one another.
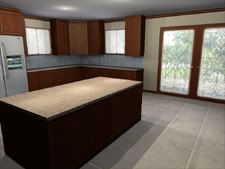
- If you are having a difficult time in visualizing a design, consider a 3D visualization studio. In these days, they can create a photo-realistic version of your interior or exterior. For more information, type in "architectural rendering" in a search engine. Currently, you can find some incredible studios in south Florida, New York City, and other major cities.
- Google SketchUp (free; see External Links) can be helpful in designing room layouts and for visualizing the final layout.
- Most of all, have fun!
Warnings
- Visit the City Planning and Zoning office before proceeding further. Find out what you can build on your property, where the setbacks are, how tall you can go, and what you may need a variance for.
- Avoid the mistake of bringing copies of plans into the very beginning of the process. Most important to the success of your design is giving the people involved in the process permission to just get it all out. Everyone has something that they want most out of the process. Don't ruin the chance to capture those thoughts, hopes and desires by distractingly focusing on the wrong things too early on. Get what you want out of this stage!
- Don't be afraid to talk to a professional about helping you out right from the beginning of this process. Most good residential architects will consult with you early on in the process for a minimal fee.
Related wikiHows
- How to Navigate the Home Building Process
- How to Make Blueprints
- How to Choose a Home Improvement Contractor
- How to Remodel a House
- How to Buy a Home
- How to Increase the Value of Your Home
- How to Succeed at Any Home Improvement Project
- improve all your work what you do and check everything you do.
Sources and Citations
Article provided by wikiHow, a collaborative writing project to build the world's largest, highest quality how-to manual. Please edit this article and find author credits at the original wikiHow article on How to Design Your Own Home. All content on wikiHow can be shared under a Creative Commons license.